
Introduction
Welcome to our comprehensive ASP.NET Core 6 tutorial. In the dynamic landscape of web development, ASP.NET Core stands out as a robust and versatile framework for building modern web applications. With the release of ASP.NET Core 6, Microsoft continues to push the boundaries of web development, offering developers a powerful set of tools and libraries for creating scalable, high-performance web applications. In this comprehensive guide, we’ll delve into the world of ASP.NET Core 6 web development, exploring its key features, best practices, and how to leverage its capabilities to build sophisticated web applications.
Understanding ASP.NET Core 6
ASP.NET Core 6 is the latest iteration of Microsoft’s open-source, cross-platform web framework, designed to empower developers to build a wide range of web applications, including MVC (Model-View-Controller) applications, Web APIs, and real-time applications. Understanding ASP.NET Core 6 Key features:
- Improved Performance: ASP.NET Core 6 introduces several performance enhancements, including optimized routing, faster JSON serialization, and improved middleware pipeline, resulting in faster response times and better scalability for web applications.
- Blazor Enhancements: With ASP.NET Core 6, Blazor continues to evolve as a compelling option for building interactive web applications using C# and Razor syntax. New features in Blazor include support for hybrid applications, prerendering improvements, and enhanced component model.
- GraphQL Support: ASP.NET Core 6 adds built-in support for GraphQL, a query language for APIs, allowing developers to define a schema and execute queries against it, providing a more efficient and flexible alternative to traditional REST APIs.
- Razor Pages: Razor Pages is a lightweight web framework for building web UI with Razor syntax, similar to ASP.NET Web Forms but with a more modern and simplified approach. ASP.NET Core 6 enhances Razor Pages with new features and improvements, making it even easier to build web applications with minimal ceremony.
- Authentication and Authorization: ASP.NET Core 6 provides robust support for authentication and authorization, including built-in authentication middleware, support for OAuth and OpenID Connect, and role-based authorization policies, making it easy to secure web applications against unauthorized access.
- Dependency Injection: ASP.NET Core 6 includes a built-in dependency injection container, allowing developers to easily manage dependencies and promote loose coupling between components, resulting in more maintainable and testable code.
- Integration with Azure: ASP.NET Core 6 offers seamless integration with Azure services, allowing developers to build and deploy web applications to the cloud with ease, leveraging services such as Azure App Service, Azure Functions, and Azure DevOps for CI/CD pipelines.
Building Web Applications with ASP.NET Core 6 With Example
Now that we have a solid understanding of ASP.NET Core 6 and its key features, let’s explore how to build web applications using this powerful framework. In this section, we’ll walk through the process of creating a simple MVC application, setting up routing, controllers, views, and models.
Step 1: Create a New ASP.NET Core 6 Project
Open Visual Studio or your preferred code editor and create a new ASP.NET Core web application project. Choose the “ASP.NET Core Web App (Model-View-Controller)” template and give your project a name.
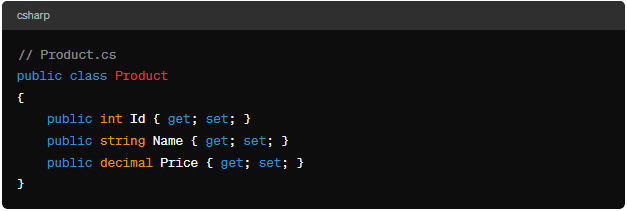
Step 2: Define Models
As you embark on your ASP.NET Core 6 tutorial journey, one of the fundamental steps is to define the data models for your web application using C# classes. These models serve as the backbone of your application, representing the entities and defining their properties and relationships.
ASP.NET Core 6 data model example:
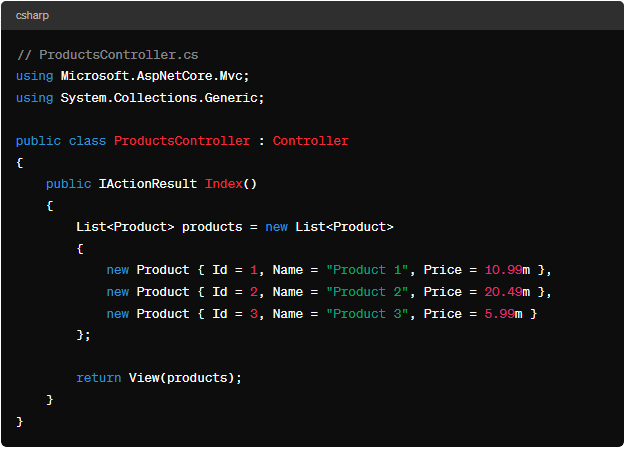
Step 3: Create Controllers
In ASP.NET Core 6, creating controllers plays a pivotal role in handling incoming requests and orchestrating the interaction between the models and views. Controllers serve as the backbone of your web application, containing action methods that respond to HTTP requests and execute the necessary business logic.
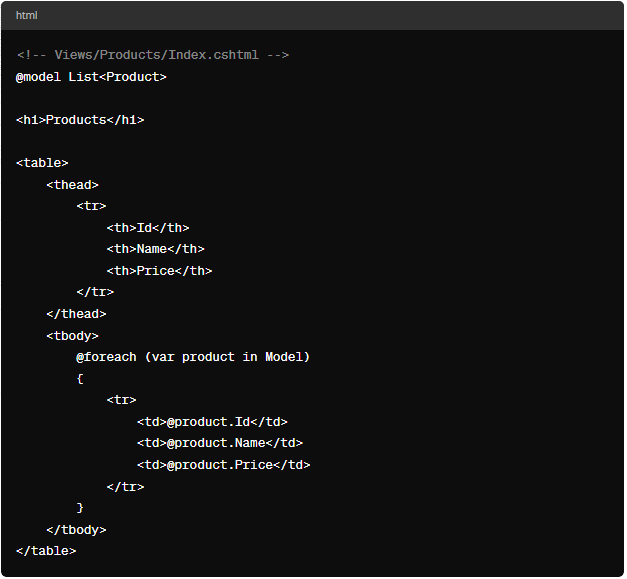
Step 4: Implement Views
Create views to generate HTML markup and present data to the user. Views are typically HTML files with embedded Razor syntax that allow you to dynamically generate content based on data passed from the controller.
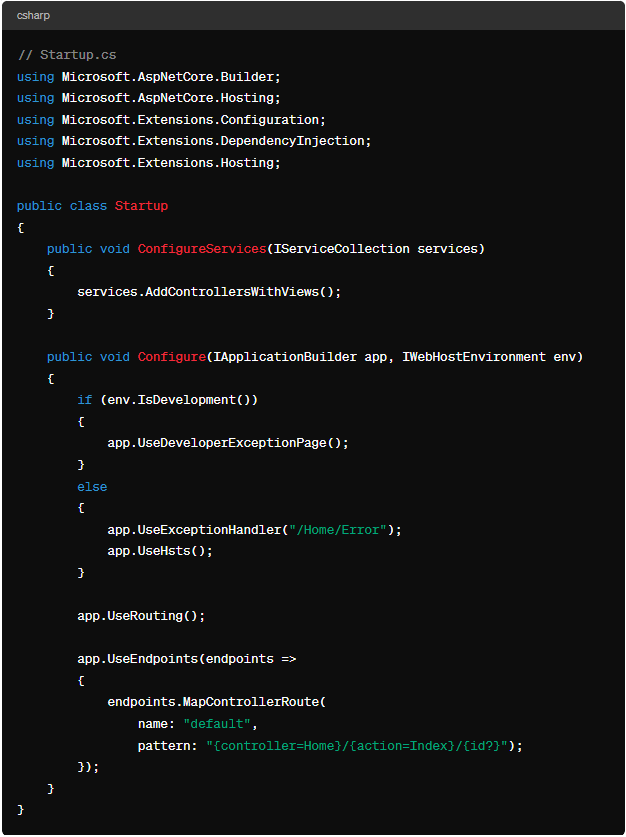
Step 5: Configure Routing
Configure routing to map incoming requests to the appropriate controller action methods. Routing determines which controller and action method should handle each request based on the URL and HTTP method. Routing is typically configured in the Startup.cs file. Ensure that the appropriate routes are configured to map incoming requests to controller action methods.
Step 6: Run and Test Your Application
Run your ASP.NET Core application and test it in a web browser to ensure that everything is working as expected. Use the built-in development tools to debug and troubleshoot any issues that arise during testing.
Run your ASP.NET Core application and navigate to the appropriate URL (e.g., https://localhost:5001/Products) in a web browser to test it.
This is a basic example to get you started with ASP.NET Core MVC. You can expand upon it by adding more models, controllers, views, and configuring additional features as needed for your application.
Best Practices for ASP.NET Core 6 Web Development
To ensure the success of your ASP.NET Core 6 web development projects, it’s important to follow best practices and adhere to established conventions. Here are some tips for building robust and maintainable web applications:
- Use Dependency Injection: Leverage the built-in dependency injection container in ASP.NET Core 6 to manage dependencies and promote loose coupling between components.
- Separation of Concerns: Follow the MVC architectural pattern to separate concerns and keep your application’s logic, presentation, and data access code separate and organized.
- Authentication and Authorization: Implement authentication and authorization to secure your web applications against unauthorized access. Use built-in authentication middleware and role-based authorization policies to control access to resources.
- Unit Testing: Write unit tests to validate the behavior of your application’s components in isolation. Use tools like xUnit and Moq to write and run unit tests for controllers, services, and other components.
- Logging and Error Handling: Implement logging and error handling to capture and log errors and exceptions that occur during the execution of your application. Use structured logging and log aggregation tools to monitor and analyze application logs.
- Performance Optimization: Optimize the performance of your ASP.NET Core 6 web applications by minimizing unnecessary database queries, optimizing network requests, and caching frequently accessed data.
- Continuous Integration and Deployment: Implement CI/CD pipelines to automate the build, test, and deployment process for your web applications. Use tools like Azure DevOps or GitHub Actions to set up automated build and deployment pipelines.
Conclusion
ASP.NET Core 6 is a powerful and versatile framework for building modern web applications. With its enhanced performance, rich feature set, and seamless integration with Azure services, ASP.NET Core 6 empowers developers to build scalable, high-performance web applications that meet the needs of today’s demanding users. By following best practices and leveraging the capabilities of ASP.NET Core 6, you can build robust, maintainable web applications that deliver a superior user experience and drive business success.
In this guide, we’ve covered the key features of ASP.NET Core 6, walked through the process of building a simple MVC application, and provided best practices for ASP.NET Core 6 web development. Armed with this knowledge, you’re well-equipped to embark on your journey of mastering ASP.NET Core 6 web development and building modern, scalable web applications that delight users and drive business growth. Happy coding!