
Middleware in ASP.NET Core is a key concept and is used to handle requests and responses in a web application. Middleware components are assembled into a pipeline to handle HTTP requests. Each component in the pipeline can process an incoming request, and, depending on its logic, either pass the request to the next component in the pipeline or handle the response directly.
How Middleware in ASP.NET Core Works:
- Incoming Request: When an HTTP request comes into the ASP.NET Core application, it is passed through a sequence of middleware components.
- Processing: Each middleware component can:
- Inspect and modify the request.
- Perform actions based on the request.
- Pass the request to the next middleware in the pipeline.
- Outgoing Response: The middleware can also process and modify the response before it is sent back to the client.
Why We Use Middleware in ASP.NET Core:
- Request Handling: Middleware can handle various aspects of request processing, such as authentication, logging, exception handling, and routing.
- Modularity: By using middleware, developers can create modular components that can be reused across different applications.
- Separation of Concerns: Middleware allows for clear separation of different aspects of request processing, making the codebase easier to manage and maintain.
Example of Middleware in ASP.NET Core:
Here’s a simple example of how to set up Middleware in ASP.NET Core application:
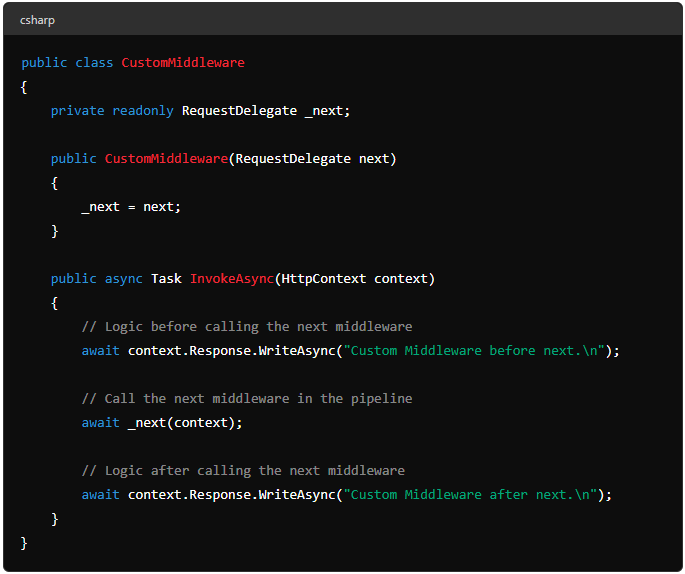
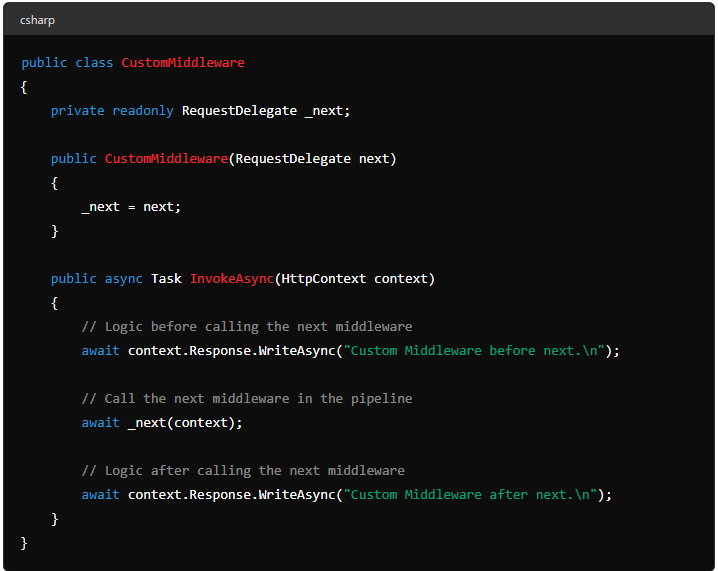
1. Creating a Middleware:
2. Registering Middleware in the Pipeline:

In this example, CustomMiddleware is a middleware component that performs some logic before and after calling the next middleware in the pipeline. In the Startup class, this custom middleware is registered using app.UseMiddleware<CustomMiddleware>().
Common Use Cases for Middleware in ASP.NET Core:
- Authentication and Authorization: Verifying user credentials and permissions.
- Logging: Recording details about each request and response for monitoring and debugging.
- Error Handling: Catching and handling exceptions that occur during request processing.
- Static Files: Serving static files like HTML, CSS, and JavaScript directly from the filesystem.
- Routing: Directing incoming requests to the appropriate endpoint based on the URL.
By understanding and effectively using middleware, developers can build robust, modular, and maintainable web applications in ASP.NET Core.
To create custom middleware in ASP.NET Core, you need to follow these steps:
- Create the Middleware Class: Define a class that includes the middleware logic.
- Implement the Middleware: The middleware class should have an
InvokeorInvokeAsyncmethod. - Register the Middleware: Add the middleware to the application’s request pipeline in the
Startupclass.
Step-by-Step Example For Create Custom Middleware in ASP.NET Core:
1. Create the Middleware Class
First, define a class for your custom middleware. This class should include a constructor that accepts a RequestDelegate parameter and an InvokeAsync method that handles the HTTP context.
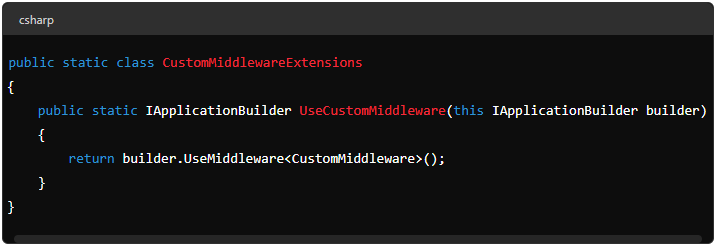
2. Create an Extension Method for Middleware Registration
It’s a common practice to create an extension method to register the middleware, which makes the registration cleaner and more readable.
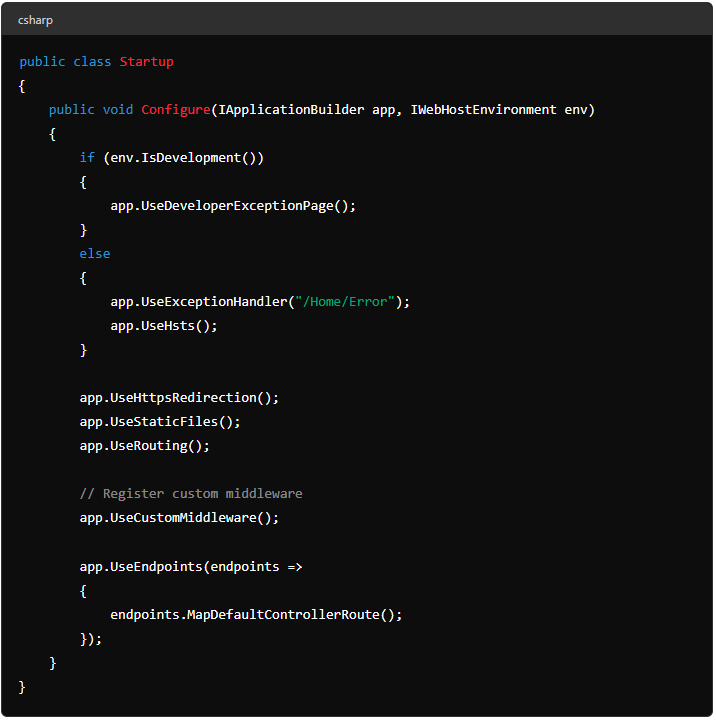
3. Register the Middleware in the Pipeline
In the Startup class, add your custom middleware to the request pipeline using the extension method you created.
Explanation:
- Middleware Class (
CustomMiddleware):- Constructor: Takes a
RequestDelegateparameter, which is a delegate pointing to the next middleware in the pipeline. - InvokeAsync Method: Contains the logic to handle the request. Here, you can write code to modify the request, add headers, log information, etc. After your logic, you call
_next(context)to pass control to the next middleware.
- Constructor: Takes a
- Extension Method (
CustomMiddlewareExtensions):- UseCustomMiddleware: An extension method for
IApplicationBuilderthat adds the custom middleware to the request pipeline.
- UseCustomMiddleware: An extension method for
- Startup Class (
Configuremethod):- app.UseCustomMiddleware(): Adds your custom middleware to the middleware pipeline. The order in which you add middleware is important, as it determines the order of execution.
Use Cases for Custom Middleware:
- Authentication/Authorization: Custom logic to authenticate or authorize requests before passing them to the main application logic.
- Logging/Diagnostics: Capture and log details about incoming requests and outgoing responses for monitoring purposes.
- Error Handling: Centralized handling of exceptions that may occur during request processing.
- Response Modification: Modify the HTTP response, such as adding headers or altering content, before it is sent back to the client.
Creating custom middleware in ASP.NET Core allows you to encapsulate specific functionality in a reusable and modular way, enhancing the maintainability and flexibility of your application.
In the context of ASP.NET Core middleware, both HttpContext and RequestDelegate play crucial roles. Let me explain their functions:
Roles in Middleware
When you create custom middleware, HttpContext and RequestDelegate enable the middleware to perform its role effectively:
- HttpContext:
- Inspection: You can inspect the incoming request to check headers, query parameters, authentication status, etc.
- Modification: You can modify the request or response, such as adding headers, changing response status codes, or writing to the response body.
- Data Sharing: You can use
HttpContext.Itemsto store data that other middleware components or request handlers can access.
- RequestDelegate:
- Pipeline Control: Calling the
RequestDelegateinstance (usually_nextin custom middleware) passes control to the next middleware component in the pipeline. - Middleware Sequence: By calling
_next(context), you ensure that subsequent middleware components get a chance to process the request and response.
- Pipeline Control: Calling the
Use Of HttpContext:
HttpContext represents all the HTTP-specific information about an individual HTTP request and response. It encapsulates everything related to an HTTP transaction and provides access to the following:
- Request: Contains details about the incoming HTTP request, such as headers, query strings, form data, cookies, etc.
- Response: Allows you to manipulate the HTTP response, such as setting status codes, headers, cookies, and writing response data.
- User: Represents the user making the request, including claims and authentication information.
- Items: A key-value store for sharing data across middleware components and throughout the request lifetime.
- Features: Access to server-specific features for the current request.
In the middleware, HttpContext is used to inspect, modify, and respond to HTTP requests and responses.
Use Of RequestDelegate:
RequestDelegate is a delegate that represents the next middleware in the pipeline. It is a function that can process an HttpContext and returns a Task, indicating asynchronous operation. When you create custom middleware, you inject RequestDelegate into your middleware’s constructor to call the next middleware in the pipeline.
Summary:
- HttpContext: Used to access and manipulate HTTP request and response data.
- RequestDelegate: Represents the next middleware in the pipeline, allowing for the continuation of request processing.
Together, these components enable the middleware to be powerful and flexible, facilitating various tasks such as logging, authentication, error handling, and more.